Nail trimming is an essential aspect of dog grooming that many pet owners approach with anxiety. Learning how to cut dog nails safely not only maintains your pet’s health but also prevents discomfort, improper gait, and potential injuries from overgrown nails.
Why Proper Nail Care Matters
Overgrown nails can cause significant problems for dogs. Long nails alter the natural alignment of the foot, potentially causing pain and affecting your dog’s gait. They can catch on furniture, carpeting, or outdoor terrain, leading to painful tears or breaks. Additionally, extremely long nails can curl under and grow into the paw pad, causing infection and severe discomfort.
Regular nail trimming prevents these issues while maintaining your dog’s comfort and mobility. Most dogs require nail trims every 3-4 weeks, though active dogs who walk frequently on concrete may naturally wear down their nails and require less frequent trimming.
Essential Tools for Safe Nail Trimming
Nail Clippers Choose appropriate nail clippers based on your dog’s size and your comfort level. Guillotine-style clippers work well for small to medium dogs with round nails, while scissor-type clippers suit larger dogs or those with thick nails. Grinder tools offer more control but require gradual introduction as the vibration and noise can be startling.
Styptic Powder Keep styptic powder readily available to stop bleeding if you accidentally cut into the quick (the pink blood vessel inside the nail). Commercial styptic powder works best, though cornstarch or flour can serve as emergency alternatives.
Treats and Rewards High-value treats help create positive associations with nail trimming. Choose something your dog finds irresistible to use specifically during nail care sessions.
Understanding Nail Anatomy
The nail consists of the hard outer shell and the inner quick, which contains blood vessels and nerves. In light-colored nails, the pink quick is easily visible, making safe trimming straightforward. Dark nails present more challenges as the quick isn’t visible, requiring extra caution and gradual trimming.
When cutting, aim to trim only the white or clear portion of the nail, staying well away from the pink quick. Cut at a 45-degree angle, removing small amounts at a time rather than attempting to cut large portions.
Step-by-Step Safe Trimming Process
Preparation Phase Choose a quiet time when your dog is relaxed, ideally after exercise or meals. Gather all supplies within easy reach. If your dog is new to nail trimming, begin by simply handling their paws regularly during calm moments to build tolerance.
Positioning Your Dog Smaller dogs can sit on your lap or on a table with a non-slip surface. Larger dogs should remain on the floor where they feel secure. Some dogs prefer standing, while others are more comfortable lying down. Have a helper restrain anxious dogs, or consider using a gentle harness for additional control.
The Trimming Process
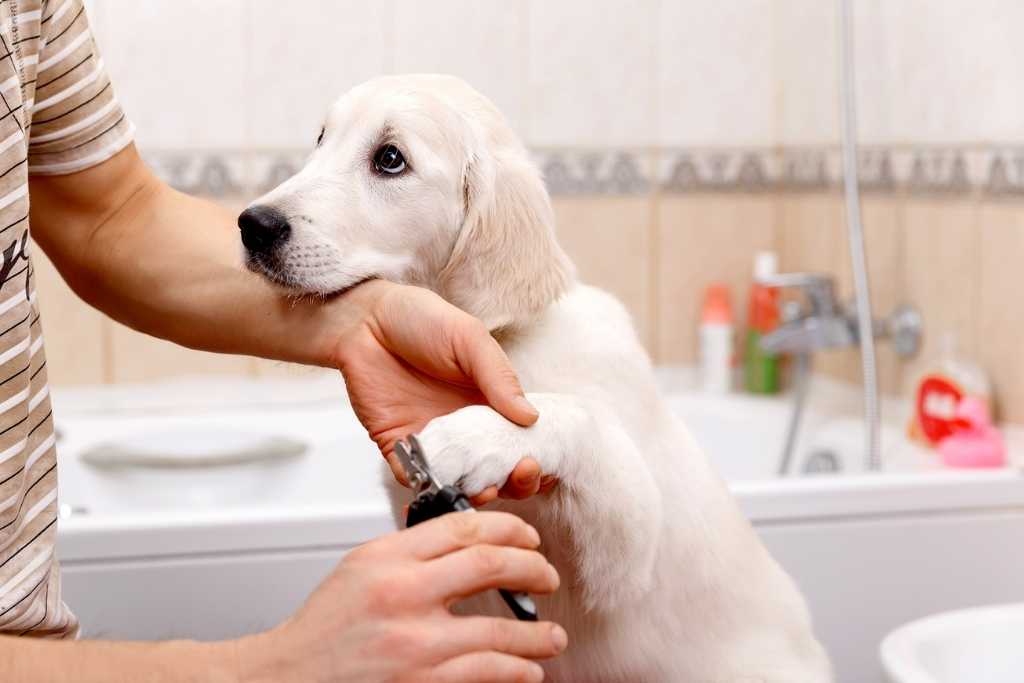
- Hold your dog’s paw firmly but gently, pressing lightly on the paw pad to extend the nail
- Position the clipper perpendicular to the nail, cutting from top to bottom
- Make quick, confident cuts to avoid crushing the nail
- Trim only the sharp, pointed tip, staying away from the curved part of the nail where the quick typically begins
- Reward immediately after each successful cut
Handling Dark Nails For dogs with dark nails, trim very small amounts at a time. Look for a small dark circle in the center of the cut surface – this indicates you’re approaching the quick and should stop cutting.
Building Positive Associations
Start nail trimming training early, ideally when your dog is a puppy. Begin by simply touching and holding paws during calm moments, rewarding with treats and praise. Gradually introduce the nail clippers, allowing your dog to sniff and investigate the tool while receiving rewards.
Practice the motion of cutting without actually trimming nails, rewarding your dog for staying calm. When you begin actual trimming, start with just one or two nails per session, gradually increasing as your dog becomes more comfortable.
Managing Accidents and Resistance
If You Cut the Quick Remain calm and immediately apply styptic powder to the bleeding nail. Hold firm pressure for several seconds until bleeding stops. Most dogs experience only momentary discomfort, similar to accidentally cutting your own nail too short. Offer comfort and treats, then continue with remaining nails if your dog remains calm.
Dealing with Resistant Dogs Some dogs may struggle, whine, or attempt to bite during nail trims. Never force the process, as this creates negative associations. Instead, return to basic paw handling exercises and build tolerance gradually. Consider using a lick mat with peanut butter or another favorite treat to provide distraction during trimming.
When to Seek Professional Help If your dog becomes extremely anxious, aggressive, or if you feel uncomfortable performing nail trims, professional groomers or veterinary staff can help. They have experience handling difficult dogs and can often complete nail trims more quickly and safely.
Trimming Frequency and Maintenance
Most dogs need nail trims every 3-4 weeks. Active dogs who walk regularly on concrete or asphalt may require less frequent trimming as these surfaces naturally file nails. Indoor dogs or those who primarily walk on soft surfaces typically need more frequent attention.
You’ll know it’s time for a trim when you hear nails clicking on hard floors or when nails touch the ground when your dog is standing normally. The goal is to keep nails just above ground level when the dog is in a natural standing position.
Alternative Methods
Nail Grinding Electric grinders offer more control but require gradual introduction. Start with the grinder turned off, allowing your dog to become comfortable with the tool. Gradually introduce the sound and vibration before actually grinding nails. Grinders are particularly useful for dogs with thick or difficult nails.
Natural Wear Encourage natural nail wear through regular walks on concrete, asphalt, or rough surfaces. While this doesn’t eliminate the need for trimming, it can extend time between formal nail care sessions.
Special Considerations
Dewclaws Don’t forget dewclaws (thumb-like appendages on the inner sides of the legs). These nails don’t touch the ground and won’t wear naturally, often requiring more frequent trimming than other nails.
Senior Dogs Older dogs may have thicker, more brittle nails requiring extra care. Arthritic dogs may need gentler handling and more frequent breaks during grooming sessions.
Puppy Nail Care Begin handling puppy paws immediately to build tolerance. Puppy nails grow quickly and are often very sharp, requiring frequent trimming to prevent scratching during play.
Health Benefits of Regular Nail Care
Properly maintained nails contribute to overall foot health, comfortable movement, and injury prevention. Regular trimming also provides opportunities to examine your dog’s paws for cuts, infections, or other issues requiring attention.
Conclusion
Learning how to cut dog nails safely requires patience, proper tools, and consistent practice. Start slowly, build positive associations, and prioritize your dog’s comfort throughout the process. With time and patience, nail trimming can become a routine part of your dog’s care that both of you can manage confidently. Remember that seeking professional help when needed is always a responsible choice for maintaining your dog’s health and your peace of mind.